
Shopify is the most popular e-commerce platform, widely used by many e-commerce brands. With its easy-to-use interface, you can showcase your products for sale and position them for success with ease. However, if you want to increase your revenue through advertising on Shopify, it’s necessary to set up conversion tracking to measure the success of your ads. In this guide, we’ll walk you through Shopify conversion tracking for your Google Ads.
Install GTM on Your Website
Installing Google Tag Manager on Shopify is a simple process that does not require you to have a web developer. First, create a GTM container under your business account. If you need help setting up a GTM account and container, refer to our Google Tag Manager Beginner’s Guide. Once you have your account and container set up, you’ll get your GTM code that you can install.
1. Within GTM, go to Admin, then select Install Google Tag Manager.
2. Copy the top code that tells you to paste in the <head>
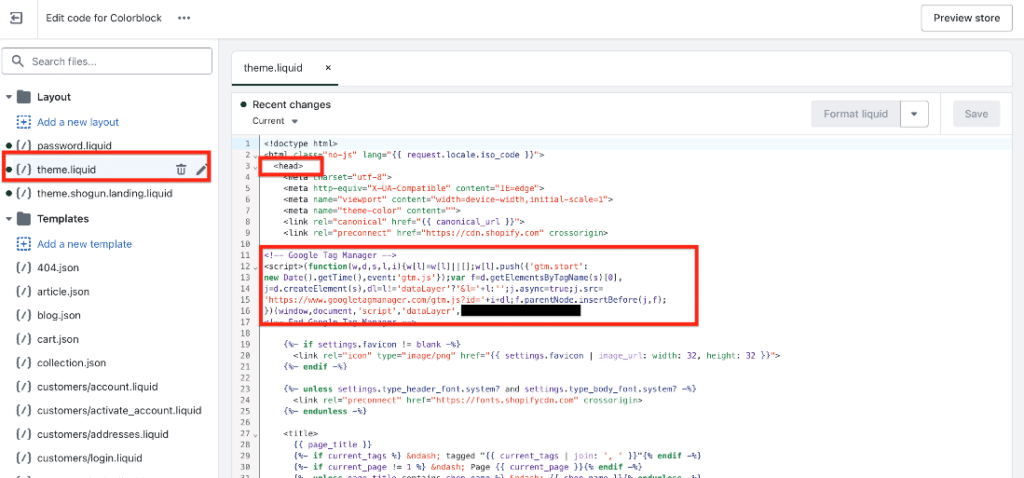
3. Go to Shopify and open your store’s code.
3a. Select the “theme.liquid” file
3b. Locate the <head> tag towards the top
3c. Paste the code underneath the meta tags, in the same spot as the image below.
4. Go back to GTM and copy the bottom code that tells you to paste in the <body>
5. In the same “theme.liquid” file, locate the opening body tag. To find it, use the shortcut Ctrl-F and type “<body” to find it.
5b. Paste the code directly underneath the opening body tag.
Make sure you save before exiting the code files
Next, you need to install the GTM header tag in your checkout to track sales.
1. Go to your Shopify dashboard and select Settings
2. In your settings, go to Checkout. Scroll to the bottom, and you should see a section where you can enter code
3. Paste your GTM code (only the one you pasted in the <head> tag) into the box
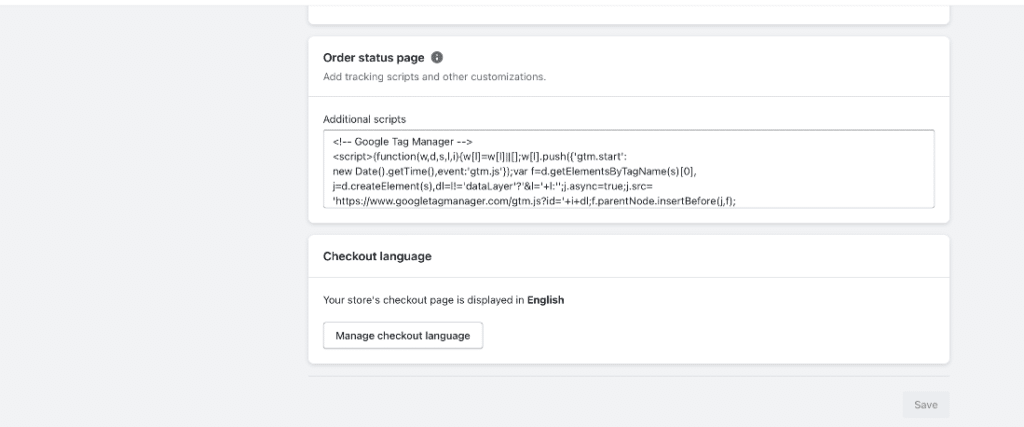
Make sure to save before returning to the dashboard
Install Shopify’s Data Layer Variables
To actually track your conversions and other metrics, you need to add what’s called a “Data Layer” to your website. A Data Layer is code that is fired when a specific action is taken on your website. For example, when someone makes a purchase on your website, there’s additional information that you want passed on to Google Ads and Google Analytics. This information is attached to variables, and these variables often include information such as order value and currency code.
For this step, you have two options. You can either find open-source code that someone else has created (this code must be specific to Shopify), or you can hire a developer. There’s plenty of code out there you can use, and for this example, we’ll being using Analyzify’s Data Layer code that is made for Shopify stores.
Here’s how to add these Data Layers to Shopify:
1. Go to Analyzify’s Data Layer page, and copy the code under “Purchase Datalayer”

2. Go back to Checkout under Settings in your Shopify store. Locate where you pasted your GTM tag, and paste this code underneath it.
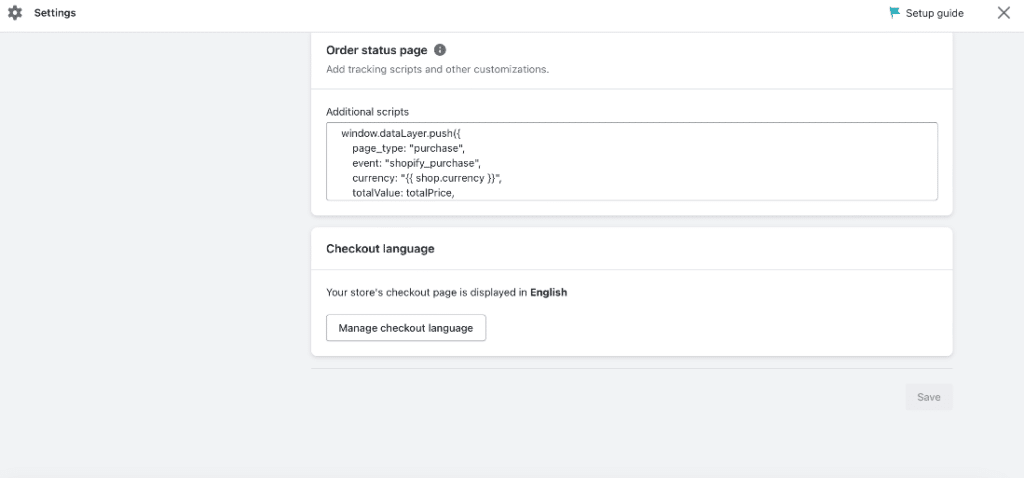
In their code, you’ll find the event name is “analyzify_purchase,” but for this example we changed the name to “shopify_purchase”
Make sure to save before exiting.
Testing the Data Layer
To make sure you have done everything correctly, you’ll need to test it out. To do this, you’ll need to create a test order on your Shopify Store.
1. Go to Setting, then Payments. Then select “Manage”
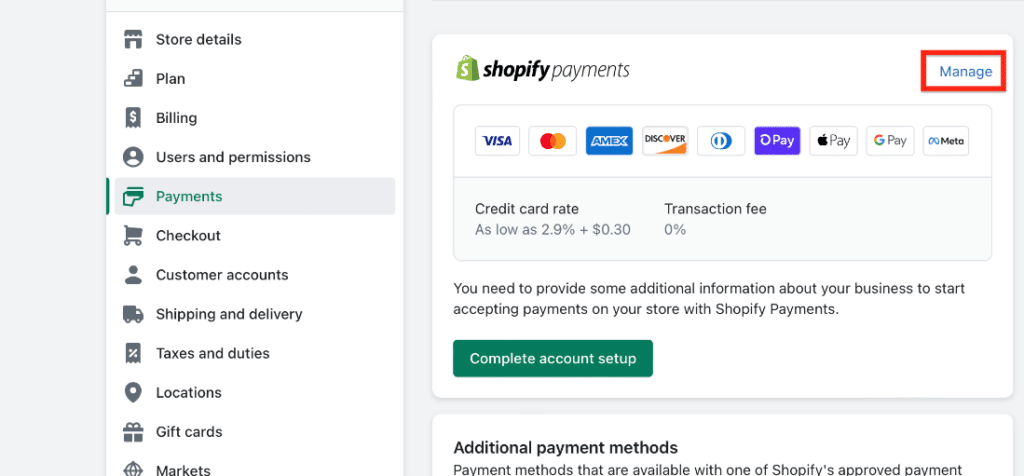
2. Scroll to the bottom and enable Test Mode
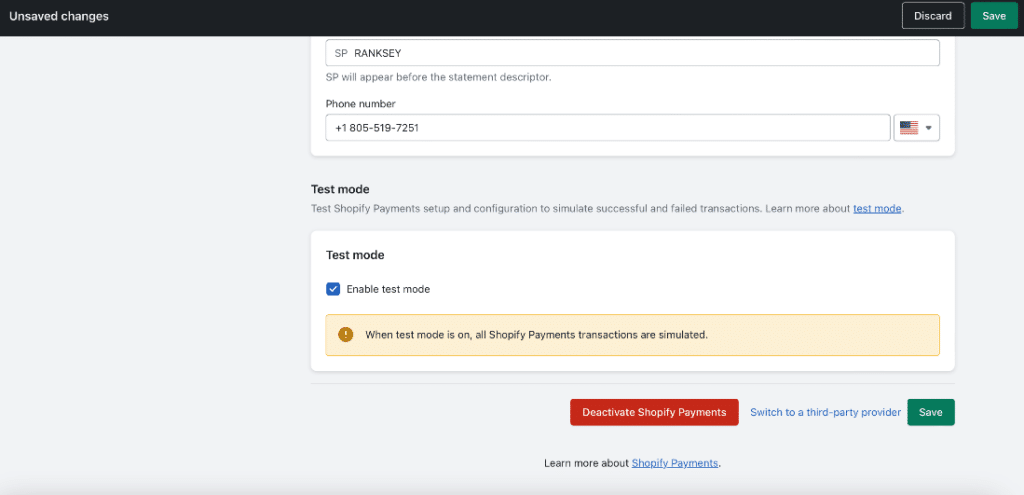
Test Mode will allow you to create fake transactions with fake credit card info to simulate orders. Make sure to save.
3. Go to GTM, click on Preview, enter your websites URL, and click on Connect
4. Once you are connected to your store and see the Tag Assistant window in the bottom right corner, add a product to cart, and go through the whole checkout process. You can enter this fake info for the payment:
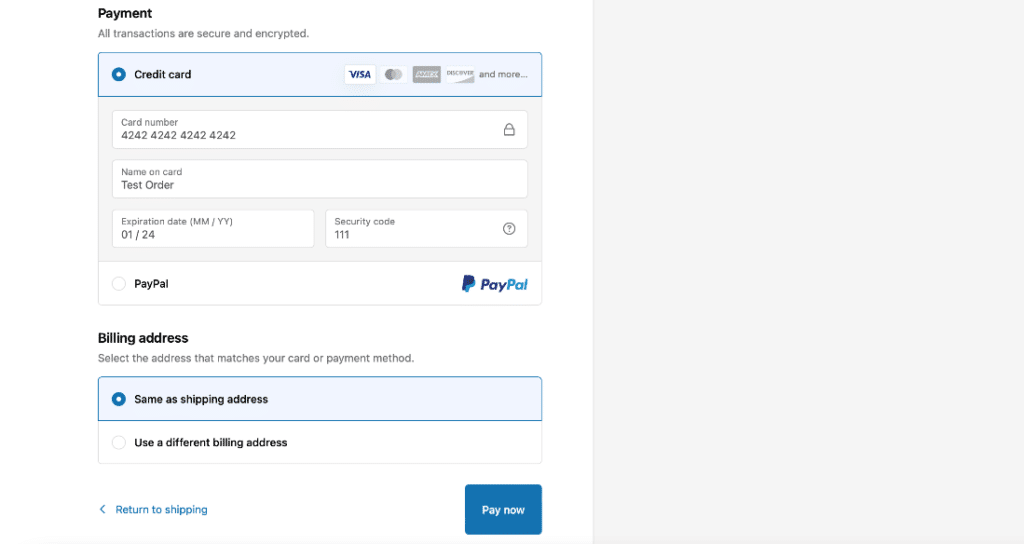
After you place the order, it will be pushed through as if it was a real order, except you won’t actually have money added to your account.
On the Tag Assistant window, you can select Finish, and it will bring you to your summary.
Now let’s take a look at the data that was pushed through:
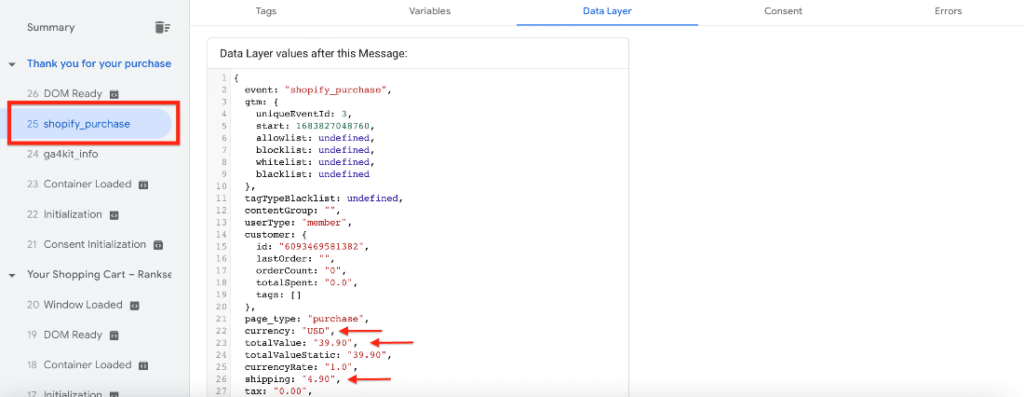
In this window, we can see the shopify_purchase event, and in the Data Layer tab, we can see important variables, like currency, totalValue, and shipping.
This data that has been added to the checkout process can now be read by Google Ads and Google Analytics so you can track it.
Before moving on to setting up conversion tracking, it’s best to keep this window open since you’ll need to add these variables to GTM. For this step:
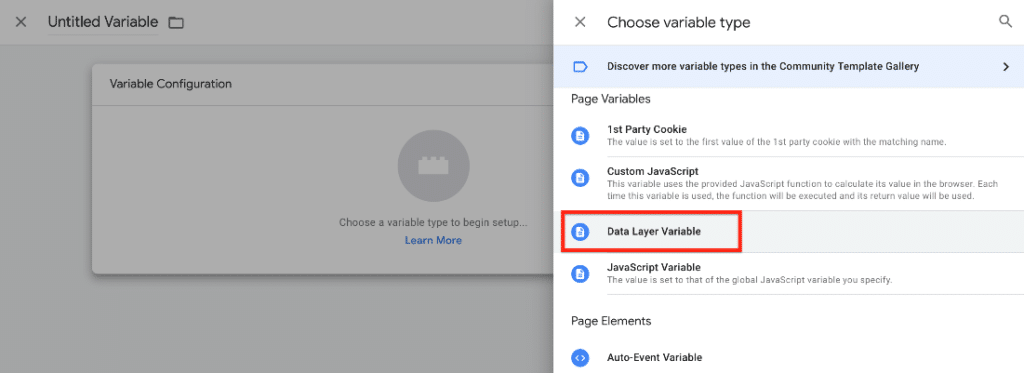
1. Go to Variables in GTM, then add a new User-Defined Variable
2. For Variable Configuration, select Data Layer Variable as the variable type
3. From Data Layer tab in the summary, copy the variable you want to add to GTM, and paste it into the field
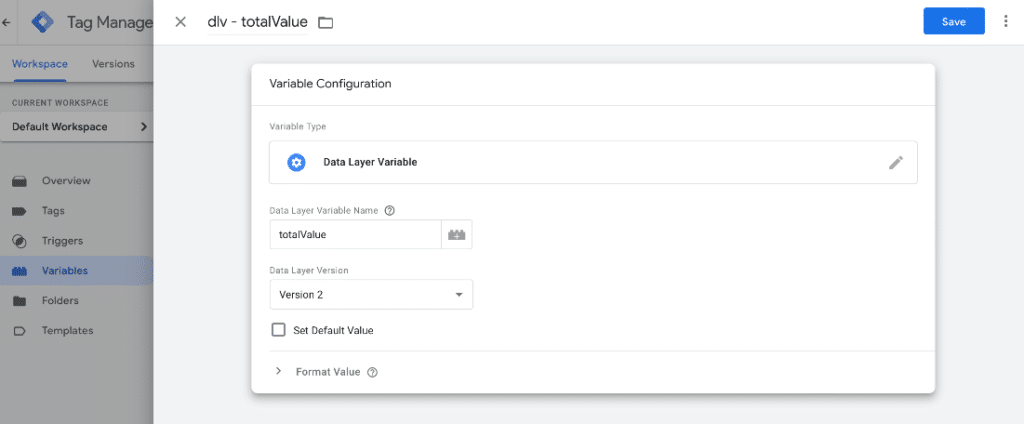
Repeat this step for Currency Code and Transaction ID, since you can add these to the Google Ads Conversion Tracking tag
Setting up a Conversion Action in Google Ads
The next step of the process is to create a conversion event in the Google Ads platform. To create a Purchase conversion event in Google Ads, first click on “Tools & Settings” and navigate to the “Conversions” option under the “Measurement” column. From the four options available (Website, App, Phone Calls, and Import), select “Website.” Then, choose “Purchase” from the drop-down menu and name the event “Purchase.”
Select “Use a Different Value for Each Conversion” and “Count Every Conversion” that takes place. Set the click-through conversion window to 30 days, the view-through window to 1 day, and ensure that “Include in Conversions” is selected.
Previously, advertisers used either a position-based or last-click attribution model. However, Google has now introduced a data-driven attribution model, which provides better insights to improve conversions.
To implement the conversion tracking code onto your website, select Use Google Tag Manager. Here, you’ll get a Conversion ID and Conversion label, which you will need for the GTM step
Setting Up the Conversion Event in GTM
Now that the Purchase event has been set up in Google Ads, it needs to be implemented in Google Tag Manager.
In GTM, you need to first create a trigger. When you go to create a new trigger, choose Custom Event as your trigger type under Trigger Configuration

Next, enter the event name from the Data Layer you added. We renamed ours “shopify_purchase” as mentioned before, so we will enter that in the Event Name field
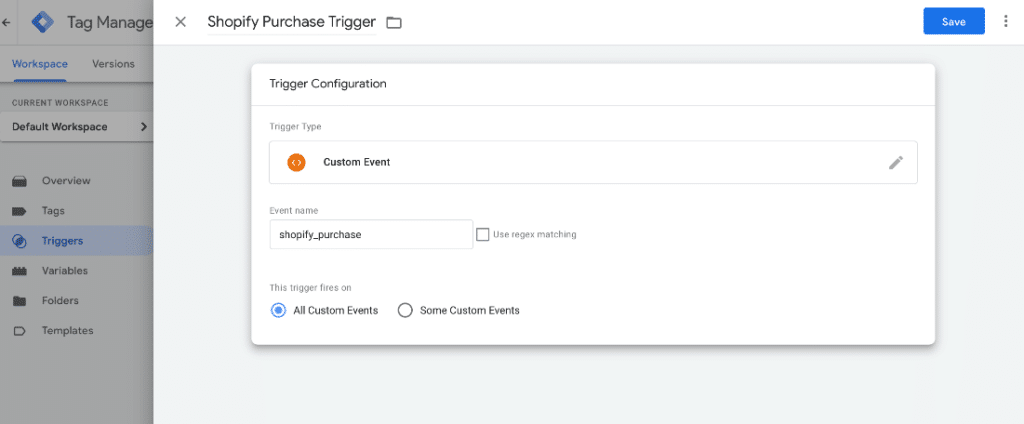
Name and save your trigger.
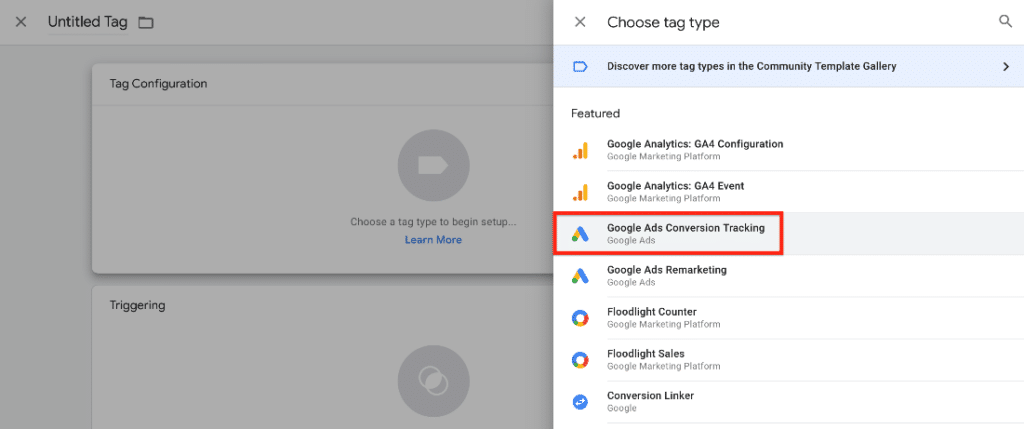
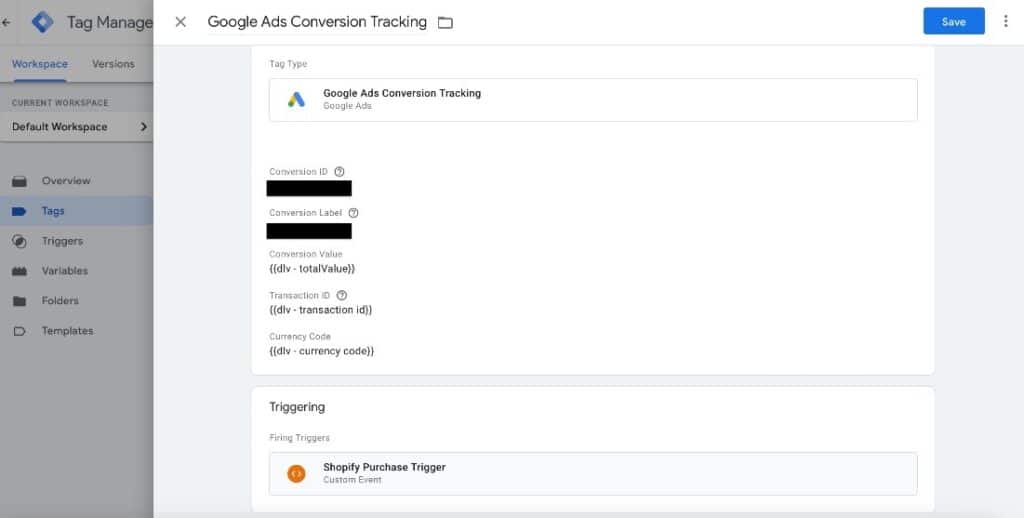
The next step is to set up the actual conversion tracking tag.
First, click on Tag Configuration and select Google Ads Conversion Tracking as the tag type
Next, enter your Conversion ID and Conversion Label that you got from Google Ads in the earlier step. You can also add your custom variables that you created previously. You can click the plus to the right of the field to select the variable instead of typing it out.
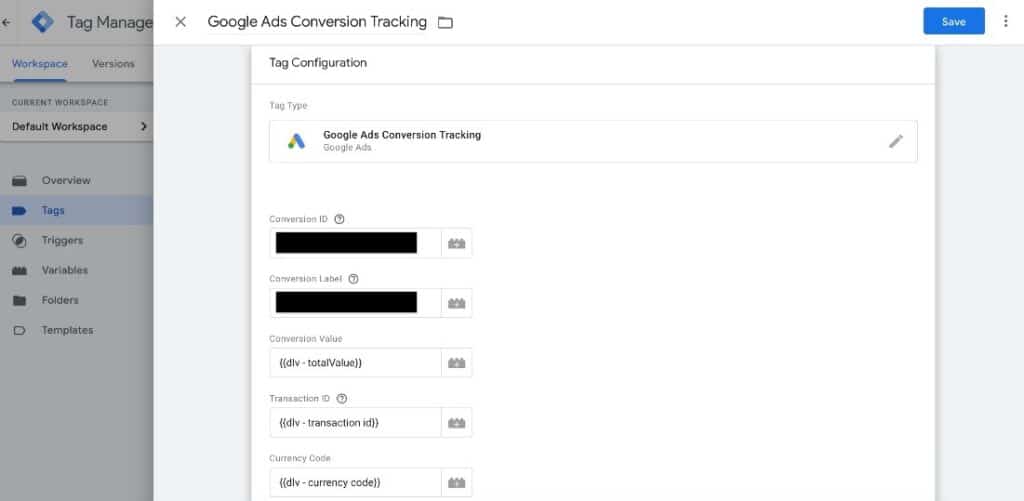
Finally, add the customer trigger and save.
To test that this tag is properly working, repeat the step where you click on Preview and create another fake order. In the Summary, you should see the name of your Google Ads Conversion Tracking tag under Tags Fired.
Conversion Tracking for GA4
If you want, you can take this a step further and track these custom events and variables in GA4. To connect your Shopify store to GA4, follow the steps in our Google Tag Manager Beginner’s Guide. The steps taken in the guide will show you how to add GA4 to tag manager, and these steps apply to any platform since this setup is done within GTM.
Setting up GA4 Custom Events with GTM
To track the data layers you added to your Shopify store, you’ll need to create a GA4 event tag in GTM.
For the tag type, select Google Analytics: GA4 Event.
Then, select the Configuration Tag you previously created.
Next, name the event, then fill out the Event Parameters. The Parameter name just needs to be named something that describes what it is. For the Value, you’ll enter the custom variables you previously created.
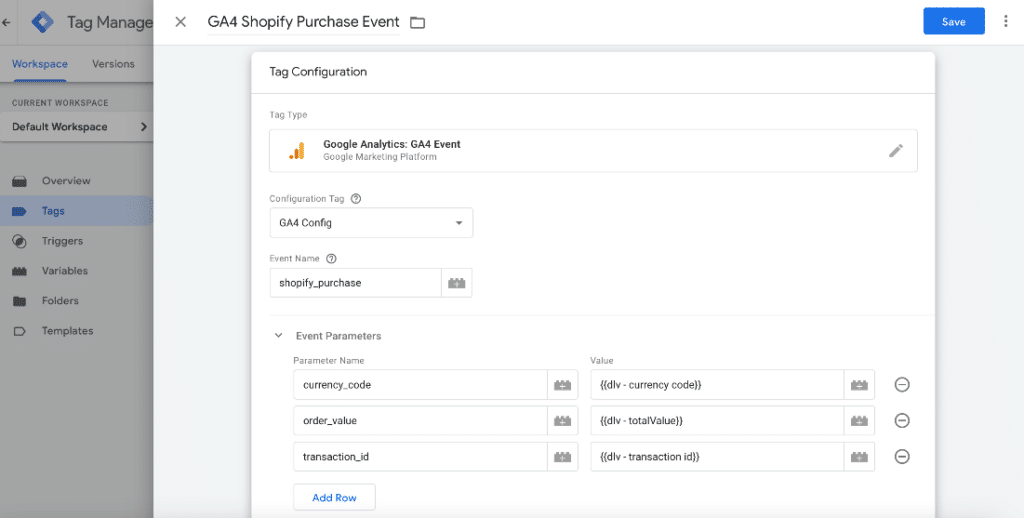
After you finish the Tag Configuration, add the custom trigger you created previously for the Google Ads Conversion Tracking Ad
Testing GA4 Custom Events
After you create the custom event, you want to make sure the data layers are being properly sent to GA4. To do this, you will need to go to the DebugView under Admin in GA4.
Before you start, make sure you do this step on a Google Chrome browser, and also download the Google Analytics Debugger Chrome Extension. Once the extension is turned on, go to GTM, select Preview, and go through the process of creating a test order as you did in previous steps.
Once you finish placing the test order, you can go to the DebugView to look at event data from that session
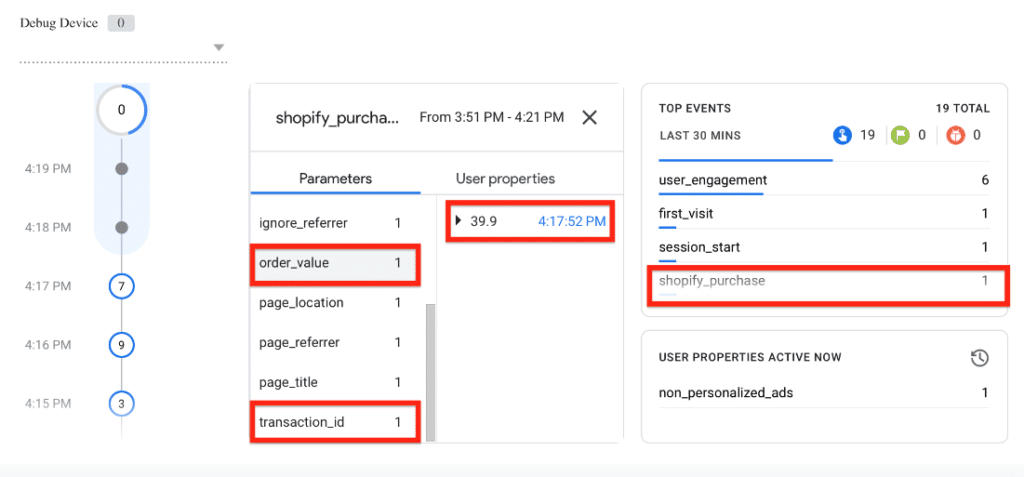
From the DebugView, we can see our shopify_purchase event was pushed through to GA4, along with the variables we added. Under order_value, it recorded the $39.90, which matches what was purchased on Shopify.
Get Help With Shopify Conversion Tracking
If you have an e-commerce business, Shopify can be a powerful platform to support your online sales. By integrating a strong paid search strategy with Google Ads, you can effectively advertise your products to a wider audience. Moreover, using Google Tag Manager can simplify the implementation process on your website, eliminating some need for a web developer. Together they work in unison to better promote your business online.
If you’re looking for some help getting your website’s conversion tracking set up with Google Ads, we set this up for all of our clients with our E-Commerce Google Ads Management services. Request a free consultation to see how we can help you!