
When you’re running Google Ads for your brand, tracking specific actions taken on your website is crucial. However, the process of setting up conversion tracking can be complicated without proper guidance. If you don’t have conversion tracking set up right, it will be impossible to accurately measure the success of your campaigns and optimize for better results, which is why it’s so important to ensure that your Google Ads conversion tracking is correctly set up.
Why You Need to Set Up Conversion Tracking
When you access your ads account, Google may suggest auto-generated conversion events; however, these may not align with your specific marketing goals. To measure the success of your marketing campaigns, it’s imperative to properly set up conversion tracking. When you install the correct tracking code, you can account for all of your conversion actions. These events can be lead form submissions, sales, or even phone calls. By doing so, you’ll begin to gather the correct metrics and can make informed marketing decisions for your business.
Different Types of Conversion Actions
As you delve into Google Ads, you’ll find that there are many different types of conversion actions that can be tracked. However, the three most common actions are lead form submissions, e-commerce sales, and phone call tracking. These three conversion actions are considered the cornerstone of paid search advertising, as they provide essential metrics for measuring the effectiveness of your campaigns.
How to Set Up Conversion Tracking in Google Ads
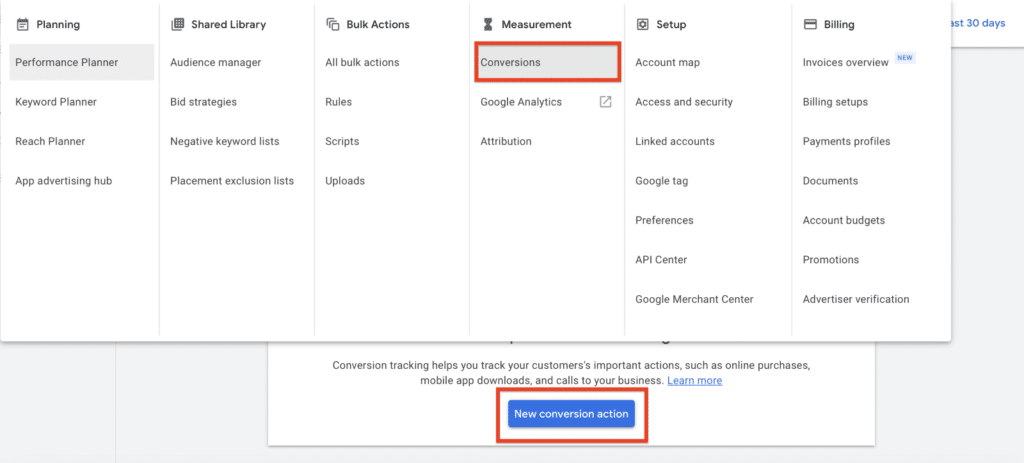
To track any type of conversion on Google Ads, you first need to add a conversion action within the platform. To do this, you need to click on “Tools and Setting” and a dropdown will appear. From here, look under the “Measurement” column and click on conversions. Then you’ll see a blue button that says “New Conversion Action.” This is where you will start adding conversion tracking for your ads.
Lead Form Submissions
Lead forms are website forms that capture customer-submitted information online. These forms can be used for a variety of purposes, such as receiving a quote or signing up for a newsletter. The information collected through lead forms can be followed up by your customer acquisition team to provide a personalized experience for the customer’s inquiry into your products or services.
Setting Up the Lead Form Conversion Action on Google Ads
When setting up a lead form conversion action in Google Ads, you’ll find the option under the Conversion page of Tools & Settings. To begin, click on the New Conversion Action button, and then choose the Website option from the four available options (Website, App, Phone Calls, and Import). Next, enter your website URL and click Scan. After your website is scanned, click on the Add a Conversion Action Manually button, and then select the appropriate lead generation category, such as Contact or Submit a Lead Form.
When naming your conversion action, it’s important to choose a name that is standard for your website and easily identifiable. It’s also standard practice to not assign a value (dollar amount) to a lead, as a submitted lead may not always result in a sale. To ensure that your metrics are not inflated, it’s recommended to count each lead as a single conversion, so that the same customer cannot submit multiple leads.
You can leave the remaining options the same as Google sets them, including the 30-day conversion window, 3-day engagement window, and 1-day view-through window. Advertisers used to rely on a multitude of attribution models depending on their marketing goals. However, with the recent introduction of Data-Driven attribution, Google’s algorithm is much more accurate in identifying the correct customer attribution automatically.
Once you click Create, you have several ways to implement the conversion event on your website. One option is to use a code snippet, which may require the assistance of a web developer. Another option is to implement the conversion event dynamically with Google Tag Manager.
Tracking Form Submissions with GTM
To set up a Google Ads Conversion Tracking tag using Google Tag Manager, begin by selecting your website’s Container on GTM and then clicking on New Tag. Next, click anywhere in the Tag Configuration section and select the predefined template for Google Ads Conversion Tracking. (If you haven’t already saved the Container Linker, be sure to activate it first.)
Then, copy and paste the Conversion ID and Conversion Label from the event you created in Google Ads into GTM. You can leave the remaining Conversion options blank.
In the Triggering section below the Tag section, choose the most appropriate lead form trigger. This could be either a Thank-You page trigger or a Form Submission trigger, both of which function in the same way. You can learn more about how to set up triggering events in our Google Tag Manager Beginners Guide.
Once the trigger is set, give the entire tag a name that will help you easily identify the event. Finally, submit the newly created Tag and Trigger to make it live on your website.
Testing Form Submission Conversion Tracking
To ensure that a newly created conversion event in Google Ads is properly triggered and activated, it’s important to test it. To test the lead form conversion event, go to your website’s GTM container and click on Preview. This will open a new webpage from your submitted URL.
Once the Preview box appears at the bottom of the screen, you will be in preview mode for your website. You can submit a test form by manually entering test/fake customer information. After submitting the form, check GTM to ensure that the Tag has been triggered for the lead form.
Next, switch back to Google Ads and refresh the page to see if the Unverified option changes to No Conversions. If it does, hover over the hyperlink to see the last time the Tag was activated on your website. This will confirm that the lead form conversion event has been properly triggered and activated.
Sales
When it comes to tracking sales or transactions in Google Ads, the process is slightly different from lead generation. Sales are tracked using Google Analytics with Enhanced Ecommerce. Enhanced Ecommerce is an additional layer of information that is sent from your website to Analytics about your customers.
This information goes beyond the basic details of the products purchased and the revenue generated per transaction. Enhanced Ecommerce can include first-party information on item data, impression data, product data, promotion data, and action data.
Once you have set up Google Analytics to track your e-commerce website, you can use it to measure sales made through the use of Shopping Ads in Google Ads.
Method #1: Importing Sales from Google Analytics 4
The first way to track conversions from Google Ads is by importing the conversion action from GA4. For this to work, you would first need to connect your website to GA4, then set up conversion and sales tracking there. The method of setting up conversion tracking on GA4 will vary based on what platform you are using.
Once it is set up on Google Analytics 4, you can add a new conversion action, then click on “Import” and “Import from Google Analytics 4”
Method #2: Use GTM for Google Ads
The second way of setting up conversion tracking is to use Google Tag Manager. With this method, instead of your purchase data being fed into GA4, then imported into Google Ads, the data will go straight to Google Ads instead. Doing it this way will allow for the data to be processed faster, since GA4 takes between 24-48 hours to process it.
Before going into GTM, you need to set up the conversion action in Google Ads. Once set up, you’ll be able to see 3 options under “Tag Setup,” and you’ll click on “Use Google Tag Manager.” It will provide you with a Conversion ID and Conversion Label, which you’ll need for later.
Now, go to GTM and follow these steps:
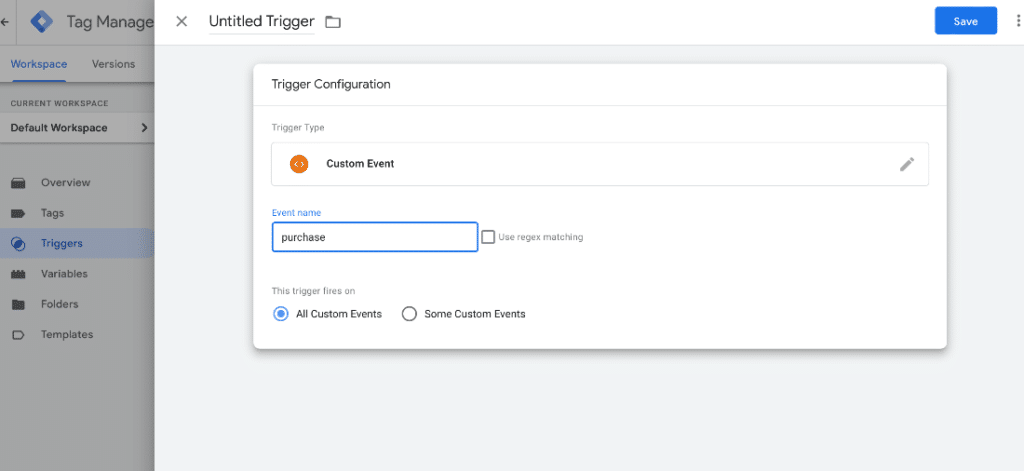
1. First, you’ll need to set up your trigger. This trigger will be a Custom Event trigger. In here, you will enter the event name that is fired in your sites code when someone makes a purchase. To find this, you’ll need to use the tag assistant.
In the GTM overview in the top right, you’ll see a button that says “Preview.” Click on it, enter your website’s URL, and go through the entire checkout process from start to finish. You can put your website in test mode so that you can enter fake credit card information to simulate a real purchase.
Once you have gone through this process, you can go to the diagnostic page that GTM automatically opened. It will look something like this:
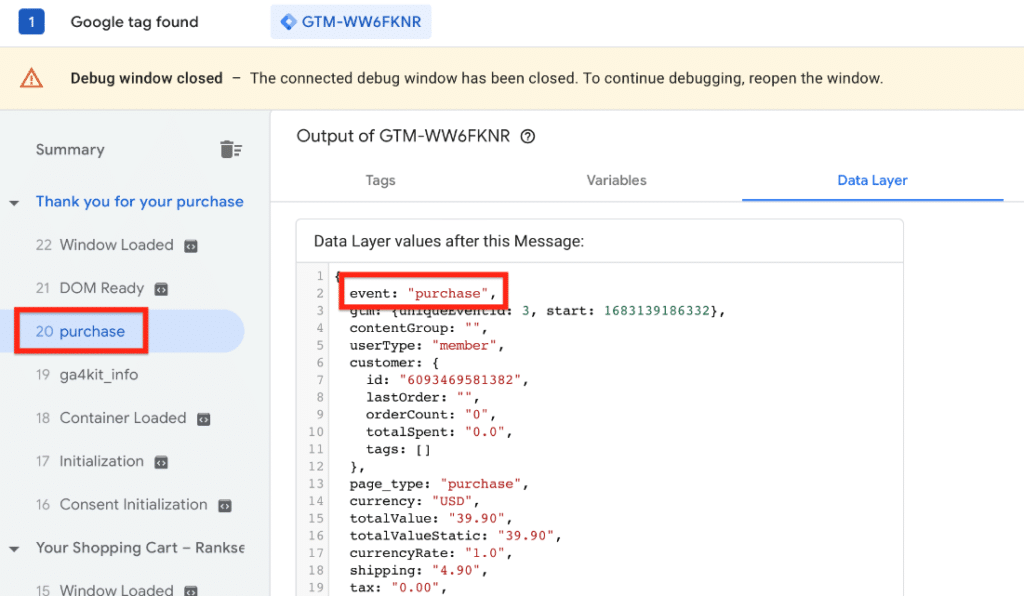
2. Now that you have the event data, you can set up your trigger. For this trigger, you’ll need to create a Custom Event trigger. In the Event Name field, enter the name of the event that shows up in your event code.
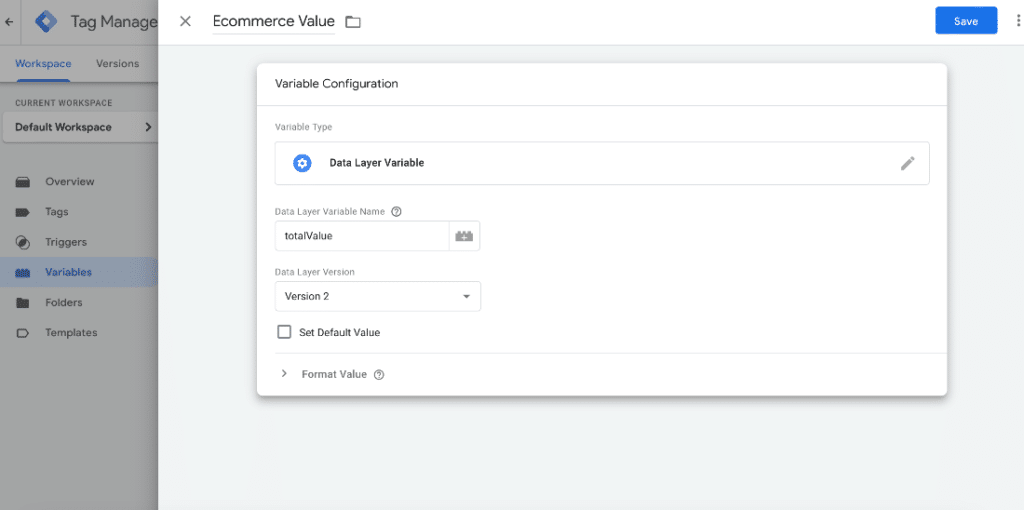
3. In the image in step 1, you can see that within the event that fired, it also provides extra variables below, such as “totalValue”. These variables are important, so you’ll want to add these into tag manager now so you can add them to your conversion tracking tag later on.
To add these variables, go to “Variables” in GTM, and create a “User-Defined Variable.”
For the variable type, select “Data Layer Variable”
Then, enter the variable name just as it is in your event data.
Once your variables are created, you can now create the Google Ad Conversion Tracking tag.
4. Go to GTM and create a new tag. For tag configuration, select Google Ads Conversion tracking.
Copy the Conversion ID and Conversion Label from Google Ads and paste them into the fields accordingly. In the other three fields, you can add the variables that you created.
For the trigger, add the Custom Event trigger you created in step 1.
Your tag setup should look something like this:

The Conversion ID and Conversion Label are entered in, and the Conversion Value field contains the variable we created in step 3.
Phone Calls
Google Ads can also track phone calls as a conversion event. Depending on your industry, some customers may prefer calling your customer acquisition team over filling out a lead form on your website. By providing both options on your landing page, you can offer your customers a better experience with how they can reach out to you for your products or services.
Setting Up the Conversion Action in Google Ads
To set up phone call tracking in Google Ads, start by navigating to the Google Ads navigation dashboard and clicking on Tools & Settings. From there, select Conversions under the Measurement column and then Click the New Conversion Action blue button. Now choose the Phone Calls option out of the four options Website, App, Phone Calls, and Import.
Next, select “Calls to a phone number on your website” and click Continue. Name the conversion event for your website. Next, change the Value checkmark to “Don’t Use a Value for This Conversion Action,” as every phone call may not result in a sale of your products or services.
Next, change the Count to one so that if a customer calls multiple times the conversion will still only be counted as a single lead. Under the Phone Numbers section, select the correct country of origin (i.e., United States) and type the client’s phone number including the parentheses.
Example:
(999) 999-9999
Under Display Number, enter your phone number exactly as it appears on the website
Example:
999-999-9999
Next, set the Call Length to any time frame between 15 and 60 seconds to ensure that the phone call lead is valid.
Finally, keep the Click-Through Conversion at the standard 30 days and use the Data-Driven attribution model for phone calls.
Once you click Create, you have several ways to implement the conversion event on your website. One option is to use a code snippet, which may require the assistance of a web developer. Another option is to implement the conversion event dynamically with Google Tag Manager.
Tracking Phone Call Conversions with GTM
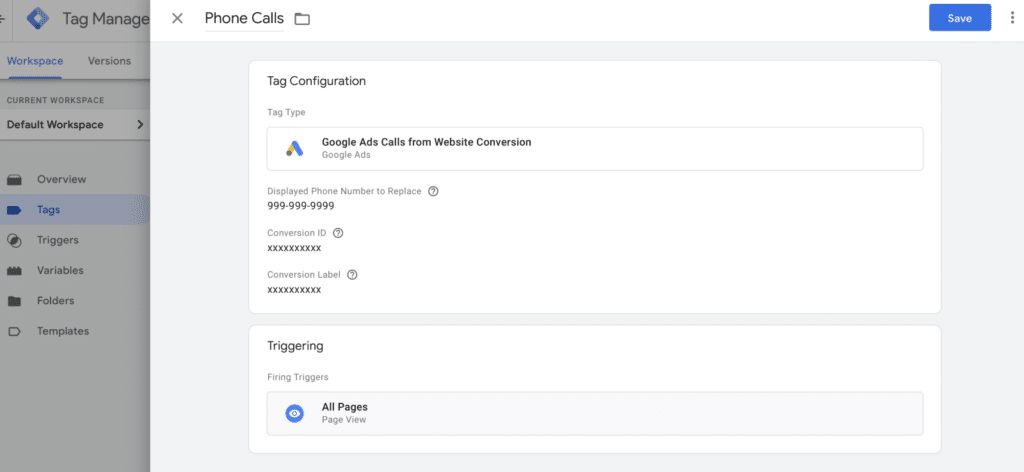
To set up Google Ads Conversion Tracking using Google Tag Manager, you can start by selecting your website’s Container on GTM and then clicking on New Tag. From there, click on Tag Configuration and select the predefined template for Google Ads Calls from Website Conversion.
Enter your phone number exactly as it appears on your website, without any parenthesis around your area code. Return to your Google Ads account and copy the Conversion ID and Conversion Label. Then, paste them into the corresponding fields in GTM.
Next, click on Triggering and select All Pages so that the trigger fires across your entire website when a phone number is clicked. Finally, save the tag and submit the Tag & Trigger so they are live on your website.
Testing Phone Call Conversion Tracking
Once you’ve submitted the Google Ads Conversion Tracking on both Google Ads and GTM, the action will be set to Unverified. To test and verify the conversion event, go to your website’s container, and click on Preview. Once the Preview box appears at the bottom of the screen, click on a phone number anywhere on your website to activate the conversion event.
Keep in mind that any third-party software like Skype could also launch as a phone call. After activating the conversion event, refresh the Google Ads conversion dashboard to verify that the Phone Call conversion action is now activated.
Get Help With Google Conversion Tracking
To measure the success of your Google Ads campaigns, it’s crucial to have the correct conversion tracking in place. Choosing the right conversion event for your marketing objectives is key, whether it’s a lead form or a transaction made on your e-commerce website. With proper tracking, you’ll be able to make informed decisions based on data, ultimately increasing profitability across your Google Ads campaigns.
The process of setting up conversion tracking can often be complicated, so if you’re not sure what you’re doing, it’s best to hire a professional. If you’re looking to run Google Ads, there’s a lot that goes into it, even aside from setting up conversion tracking. If you need help with PPC setup and management, you can request a free consultation or check out our E-Commerce PPC Management services.